Philips Support

How to connect several external devices to Philips TV?

Published on 2016-12-29

Your TV is equipped with several types of connections. The type of connection you should use to connect a certain device depends on which features of the particular device you want to use.

NOTE: for the connection of a PC refer to the FAQ on this subject.

Digital connection

The most complete connection available on your TV is the HDMI connection. This connection accepts high definition (HD) signals from external devices, such as a digital Set Top Box, a DVD-player or a game console such as the PS3.

NOTE: The HDMI connection only supports the LPCM (Linear Pulse Code Modulation) and AC3 (Dolby Digital) audio formats. The DTS (Digital Theater Systems) audio format is not supported via HDMI.

Analogue connections

  • If you want to connect more than one of this kind of external devices, the YPbPr (also called component or YUV) connection is a good choice. <

  • The next best option are the S-Video and CVBS connections, which enable you to connect devices that are not equipped with a HDMI or YPbPr connection, such as a video camera or photo camera.

After connecting several devices, you have to manually add your devices to the Home menu in order to select the devices to watch their programme. If a device is no longer connected to the TV, you can remove it from the home menu.

If the source is HDMI, the TV will automatically switch to the source input.

Follow this procedure to add your devices:

  1. Press the [Home] button on the remote control to access the home menu.
  2. Use the [Cursor buttons] to select [Add your device] and press the [OK] button.
  3. A message appears, prompting you to add a new device.
  4. Select [Start] and press the [OK] button.
  5. Use the cursor [Up] or [Down] to select the device you wish to add and press the [OK] button.
  6. Use the cursor [Up] or [Down] to select the TV connector you have used to connect the device and press the [OK] button.
    NOTE: If a particular connector has already been assigned to another device, it will not show up in the list of connectors.
  7. When the guide is completed, select [Close] and press the [OK] button.
  8. A new device icon is added to the Home menu.
  9. Repeat step 2 and 8 if you wish to add more devices.
  10. Press the [Back] button to exit the menu.

NOTE: You will not be able to change the TV connector of a previously added device. If you wish to change the TV connector of a previously added device, you will have to delete this device and re-add it with the desired connector.

Follow this procedure to remove your devices:

  1. Press the [Home] button on the remote control to access the home menu.
  2. Use the [Cursor buttons] to select the device you wish to delete.
  3. Press the [Options] button.
  4. Select [Remove new device] and press the [OK] button.
  5. A message appears, prompting you to remove the device.
  6. Select OK and press the [OK] button.
  7. The selected device icon is deleted from the Home menu.
  8. Repeat step 2 and 6 if you wish to delete more devices.
  9. Press the [Back] button to exit the menu.
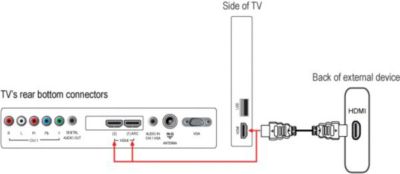
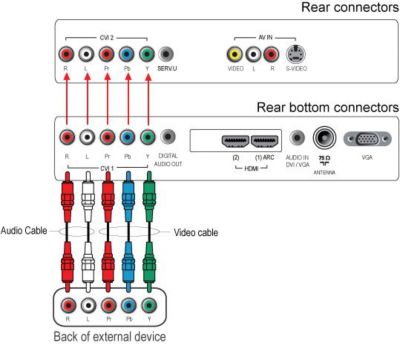
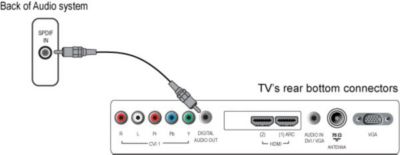
  10. Connect an audio device (home cinema set, amplifier) to the ‘DIGITAL AUDIO OUT’ connection at the back of the TV to hear the sound of the TV through your audio system.

Your TV DOES NOT have an analogue audio out (red and white) cinch connection. In order to connect the digital audio out (coax) from the TV to an analogue stereo system, you will need a Digital-to-analog converter (DAC or D-to-A). Make sure that the convertor supports the conversion of both LPCM (Linear Pulse Code Modulation) and AC3 (Dolby Digital) audio format. If you are unsure whether or not a particular converter is suitable, ask your retailer.

NOTE: This TV does not support the DTS (Digital Theater Systems) audio format. Therefore, the DTS audio signal will not pass through the ‘HDMI (1) ARC’ or the ‘DIGITAL AUDIO OUT’ (SPDIF) connection.

Connect a USB memory device to the side USB connector.

  • Your TV supports playback of multimedia files in JPEG (Photos), MP3 (Music) and Video files.
  • Portable hard discs are only supported as a mass storage device without any multimedia capabilities.
  • If your portable hard disc comes with multimedia capabilities, you have to connect your hard disc as a standard peripheral device.

If the above solution does not help, you may refer to the Philips Connectivity Guide on the Contact & support page, which will assist you in making all the necessary connections.

HDMI connection

YPbPr (also called component or YUV) connection

S-Video connection

CVBS connection

Digital Audio Out connection

The information on this page applies to the following models: 40PFL6605/98 , 46PFL6605/98 .

Frequently Asked Questions

Contact Philips

We are happy to help you

Looking for something else?

Discover all Philips Support options

Our site can best be viewed with the latest version of Microsoft Edge, Google Chrome or Firefox.