If you are wondering, what do the lights and symbols on your Philips Male Grooming device mean, then please read our answer below.
What do the symbols on my Philips Groomer mean?
Published on 20 November 2025
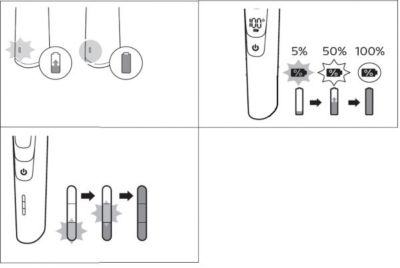
Charging indications
Most Philips Hair Clippers and Trimmers have charging indications and lights on them to indicate when your device needs to be charged and is fully charged. Depending on the device you own the charging indications may be displayed in many different ways, as shown in the image below.
Some grooming devices do not have any charging indication on them. In that case, check the product's charger to see if has a light on it. This light lights up when the charger is connected to the power supply. For these products, follow the advised charging time as instructed in the user manual.
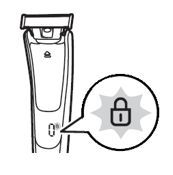
Travel lock
Some grooming devices come with a travel lock functionality to prevent your groomer from turning on by accident while travelling.
To activate the travel lock press and hold the on/off button for 3 seconds. The lock symbol will flash briefly to indicate that the device is locked now. If you try to switch it on it will not work, rather the travel lock symbol will flash to remind you to deactivate it.
To deactivate the travel lock you can again press and hold the power button for 3 seconds. The symbol will again flash briefly and then the groomer will turn on.
Some devices have the travel lock feature without a visible indicator. Locking and unlocking these devices works similarly as those with a travel lock indicator. Hold the on/off button for 3 seconds to activate or deactivate the lock feature.
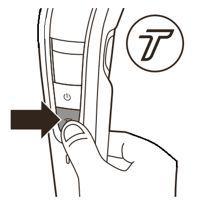
Turbo mode
Some Philips Hair Clippers and Multigroomers are equipped with a Turbo Mode. This is usually indicated with a T shaped symbol on the clipper. Press this button when you need extra power from your clipper. This can be useful when you are trimming very thick hair.
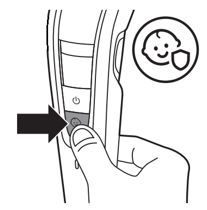
Quiet mode
A device with a baby symbol can be used to activate the quiet mode. Quiet mode provides a gentler trimming experience for children. During trimming, you can start the quiet mode to lower the rotation speed of the trimmer for a quieter trim.
Oil reminder
If you see the image of an oil drop flashing on your grooming device, this is a reminder for you to oil your groomer. You should regularly clean and oil your groomers with the oil provided in the package or sewing machine oil.
Depending on the grooming device you own, you may find other symbols printed or flashing on it. For more information regarding your exact model please refer to the user manual or contact us.
Watch the video below to see how to use our latest Philips Beard Trimmer Prestige with unique built-in comb. Keep in mind that depending on the model type, the features on the shaver will vary.

Play Pause
Opening battery compartment
Some Philips groomers operate on disposable batteries. Before attempting to insert or replace the batteries for your groomer, make sure your hands and the device are dry.
The battery compartment is located in the handle. To replace the batteries, the battery compartment can easily be opened by aligning the indications of the symbols as instructed below.
1. To remove the battery compartment cover, turn it clockwise until the setting indicator (V) points to the 'unlocked' indication (Ʌ) (Fig. 4).
2. Pull the battery compartment cover off the handle (Fig. 5).
3. Put the battery in the battery compartment (Fig. 6). Make sure the + and - poles of the battery point in the right direction.
4. Slide the battery compartment cover back onto the handle (Fig. 7).
5. Turn the battery compartment cover counterclockwise until the setting indicator (V) points to the 'locked’ indication (I) (Fig. 8).

Eject button
An eject logo or button indicates where to push to remove cutting elements or attachments. Carefully push the eject symbol while slowly pulling the cutting element or attachment off the device.
