Easy (and elegant) updo hairstyles for weddings
A great wedding hair style should let your dress or sari take centre stage, it should be as hassle-free as possible and it should make you feel like a princess. So, for gorgeous hair on the big day, you can’t go wrong with an easy-yet-romantic wedding updo. Read on to discover two wedding updo styles that’ll look beautiful all day (and night) long and that are surprisingly easy to style at home. Whether you’re looking for dreamy bridal updos or an elegant updo for a wedding guest, it’s easy to create these impressive pin-up hairstyles for weddings in no time with the help of a few styling tools. Get ready and excited for a beautiful day!
Wedding hairstyle #1: a romantic bun with curls
One great thing about this hairdo is that it looks even more beautiful if it‘s imperfect. This is one of the best wedding hairstyles for wavy or curly hair. If you have naturally straight hair, try creating some soft waves and a tousled look after washing with a round brush and a hairdryer. The EssentialCare Hairdryer cares for your hair with ThermoProtect temperature to protect against overheating, and ionic conditioning to leave you with glossy waves, not frizz.
Once your hair is ready, you can get started on this wedding updo:

Draw a natural parting and pull your hands from there directly behind the ears downwards through the hair to section off two hair sections left and right.

Use the rest of the hair to make a ponytail that sits at the nape of your neck. Secure it with a scrunchie and form a hole with your fingers directly above the scrunchie. Now you flip the ponytail up and carefully pull it through the hole so that it shows below.

Hold the ponytail with your left hand while loosening a few strands with your right hand to give a little bit more volume to the back of the head. You can also slightly loosen the hairdo on the sides so it seems softer and more natural.

Untie the sections on the sides and bind them into a second tail above the existing ponytail. While doing that, you can loosen a few strands at the front that will frame your face and soften the look.

Now, again, you flip this tail upwards and pull it through a hole you fashion above the scrunchie, as above. You may repeat this process to further twist the hair. Then you pull it through the hole of the first ponytail.

Then roll the tail from the end inwards towards the head to form a bun as if curling it around a roller. Push the end of the bun in the gap between the two scrunchies and fix it at the back of your head above the ponytail bases.
See more below ↓
What you need


Advanced KeraShine straightener
BHS378/10
Shiny smooth hair with precise control & KeraShine
With precise control and KeraShine protection, this advanced straightener is specially designed for easy and fast styling, thanks to the 6 LED temperature settings and the long Keratin-infused plates..
See all benefitsUnfortunately this product is no longer available
Wedding hairstyle #2: the hairband loop
If you have long, straight hair or you’re after a sleek wedding hairstyle, this works equally well as a bridal updo or an elegant updo for wedding guests. To get the best out of this look, straighten your hair beforehand with a straightener that is specially designed to protect your strands, such as the KeraShine Vivid Ends straightener. The plates are enriched with keratin, hair’s essential ingredient, to boost protection and shine.
Create this sleek wedding updo style with the following simple steps.
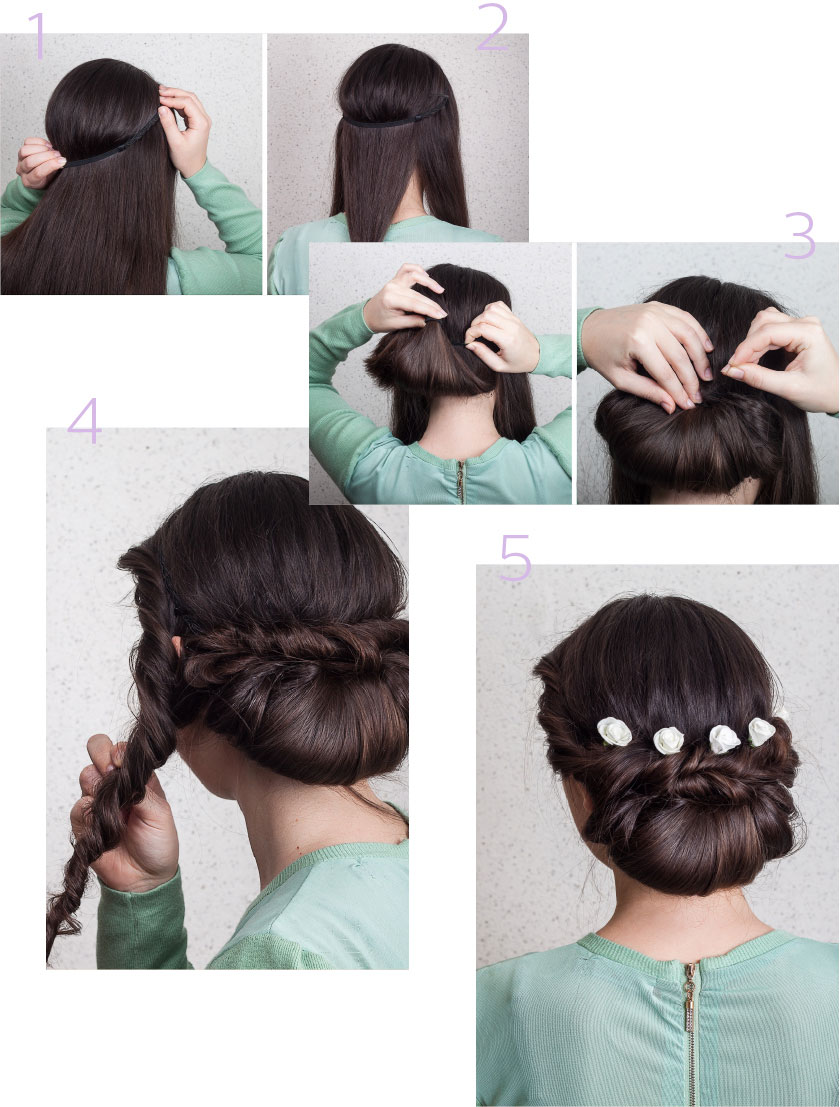
2. Gather your hair back into a ponytail, keeping some height at the top.
3. Position a pretty headband or a length of ribbon around your head, fastening it over the lengths of your ponytail at the nape of your neck.
4. Gently pull the ponytail a little further through the headband until it forms a loop that hangs over the headband. The tips of your ponytail should fall around your shoulders naturally.
5. Apply a hairspray to give the hairdo hold and to tame small hairs.
These pin-up hairstyles for weddings are quick and easy to create and make this special day even more beautiful.